Installing a DIY bare metal GPU cluster for Kubernetes
Samuel Cozannet
on 30 January 2017
Tags: bare metal , Charmed Kubernetes , containers , GPU , kubernetes , MAAS
I don’t know if you have ever seen one of the Orange Boxes from Canonical
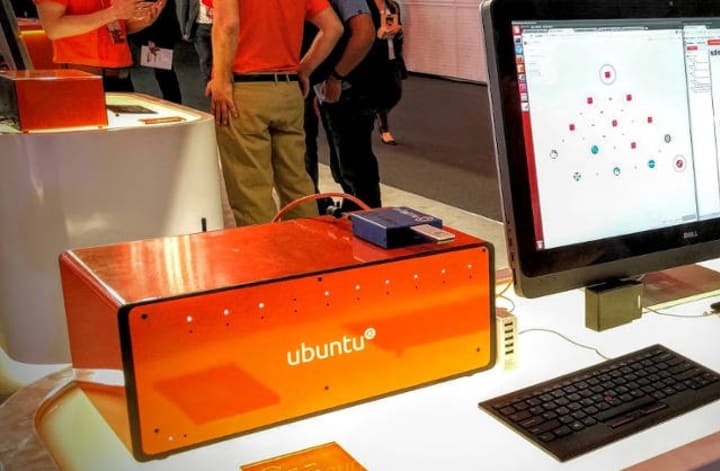
These are really sleek machines. They contain 10 Intel NUCs, plus an 11th one for the management. They are used as a demonstration tool for big software stacks such as OpenStack, Hadoop, and, of course, Kubernetes.
They are freely available from TranquilPC, so if you are an R&D team, or just interested in having a neat little cluster at home, I encourage you to have a look.
However, despite their immense qualities they lack a critical piece of kit that Deep Learning geeks cherish: GPUs!!
In this blog/tutorial we will learn how to build, install and configure a DIY GPU cluster that uses a similar architecture. We start with hardware selection and experiment, then dive into MAAS (Metal as a Service), a bare metal management system. Finally we look at Juju to deploy Kubernetes on Ubuntu, add CUDA support, and enable it in the cluster.
Hardware: Adding fully fledged GPUs to Intel NUCs?
When you look at them, it is hard to tell how to insert normal GPU cards into the tiny form factor of Intel NUCs. However they have a M.2 NGFF port. This is essentially a PCI-e 4x port, just in a different form factor.
And, there is this which converts M.2 into PCI-e 4x and that which converts PCI-e 4x into 16x.
Sooo… Theoritically, we can connect GPUs to Intel NUCs. Let’s try out!!
POC: First node
Let us start simple with a single Node Intel NUC and see if we can make a GPU to work with it.
Already owning a NUC from the previous generation (NUC5i7SYH) and an old Radeon 7870, I just had to buy
- a PSU to power the GPU: for this, I found that the Corsair AX1500i was the best deal on the market, capable of powering up to 10 GPUs!! Perfect if I wanted to scale this with more nodes.
- Adapters:
– M.2 to PCI-e 4x
– Riser 4x -> 16x - Hack to activate power on a PSU without having it connected to a “real” motherboard. Thanks to Michael Iatrou (@iatrou) for pointing me there.
- Obviously a screen, keyboard, cables…

At this point, we have proof it is possible, it’s time to start building a real cluster.
Adding little brothers
Bill of material
For each of the workers, you will need:
- Intel NUC6i5RYH is a good option for performance, but it does not have Intel AMT so you won’t be able to activate full automation of operations. Would you want to do something closer to the Orange Box with complete automation of the power cycle, you’d need to buy the older NUC5i5MYHE, which is the only reference with vPro (beside the board itself). More info here.
- RAM: 32GB DDR4 from Corsair
- SSD: 500GB Sandisk Ultra II
- Video Card: nVidia GTX1060 6GB
- Adapters: Same as before and also 4x Extenders
Then for management nodes, 2x of the same above NUCs but without the GPU and with a smaller SSD.
And now overall components:
- PSU: Corsair AX1500i
- Switch Netgear GS108PE. You can take a lower end switch, I had one available that’s all. I didn’t do anything funky on the network side.
- Raspberry Pi: Anything 2 or 3 version with 32GB micro SD
- Spacers
- ATX PSU Switch
Execution
If it does not fit in the box, remove the box. So first the motherboard of the NUC has to be extracted. Using a PVC 3mm sheet and the spacers, we can have a nice layout.

GPU View
On one side for the PVC, we attach the GPU so the power connector is visible at the bottom, and the PCI-e port just slightly rises over the edge. The holes are 2.8mm so that the M3 spacers goes through but you need to screw them a little bit and they don’t move.

Intel NUC View
On the other side, we drill the fixation holes fro SSD and Intel NUC so that the PCI-e riser cable is aligned in front of the PCI-e port of the GPU. You’ll also have to drill the SSD metal support a little bit.
As you can see on the picture, we place the riser between the PEC and the NUC so it looks nicer
We repeat the operation 4 times for each node. Then using our 50mm M3 hexa, we attach them with 3 screws between each “blade”, book up everything to the network and… Tadaaaaa!!

Close up view from the NUC side

From the GPU side
Software: Installation of the cluster
Giving life to the cluster will require quite a bit of work on the software side.
Instead of a manual process, we will leverage powerful management tooling. This will give us the ability to re-purpose our cluster in the future.
The tool to manage the metal itself is MAAS (Metal As A Service). It is developed by Canonical to manage bare metal server fleets, and already powers the Ubuntu Orange Box.
Then to deploy, we will be using Juju, Canonical’s modelling tool, which has bundles to deploy the Canonical Distribution of Kubernetes.
Bare Metal Provisioning : Installing MAAS
First of all we need to install MAAS on the Raspberry Pi 2.
For the rest of this, we will assume that you have ready:
- A Raspberry Pi 2 or 3 installed with Ubuntu Server 16.04
- The board ethernet port connected to a network that connects to internet, and configured
- An additional USB to ethernet adapter, connected to our cluster switch
Network setup
The default Ubuntu image does not auto install the USB adapter. First we shall query ifconfig to see a eth1 (or other name) in addition to our eth0 interface:
$ /sbin/ifconfig -a
eth0 Link encap:Ethernet HWaddr b8:27:eb:4e:48:c6
 inet addr:192.168.1.138 Bcast:192.168.1.255 Mask:255.255.255.0
 inet6 addr: fe80::ba27:ebff:fe4e:48c6/64 Scope:Link
 UP BROADCAST RUNNING MULTICAST MTU:1500 Metric:1
 RX packets:150573 errors:0 dropped:0 overruns:0 frame:0
 TX packets:39702 errors:0 dropped:0 overruns:0 carrier:0
 collisions:0 txqueuelen:1000
 RX bytes:217430968 (217.4 MB) TX bytes:3450423 (3.4 MB)
eth1 Link encap:Ethernet HWaddr 00:0e:c6:c2:e6:82
 BROADCAST MULTICAST MTU:1500 Metric:1
 RX packets:0 errors:0 dropped:0 overruns:0 frame:0
 TX packets:0 errors:0 dropped:0 overruns:0 carrier:0
 collisions:0 txqueuelen:1000
 RX bytes:0 (0.0 B) TX bytes:0 (0.0 B)
We can now edit /etc/network/interfaces.d/eth1.cfg with
# hwaddress 00:0e:c6:c2:e6:82
auto eth1
iface eth1 inet static
 address 192.168.23.1
 netmask 255.255.255.0
then start eth1 with
$ sudo ifup eth1
and now we have a secondary interface setup
Base installation
Let’s install first the requirements:
$ sudo apt update && sudo apt upgrade -yqq
$ sudo apt install -yqq — no-install-recommends \
   maas \
   bzr \
   isc-dhcp-server \
   wakeonlan \
   amtterm \
   wsmancli \
   juju \
   zram-config
Let’s also use the occasion to fix the very annoying Perl Locales bug that affects pretty much every Rapsberry Pi around:
$ sudo locale-gen en_US.UTF-8
Now let’s activate zram to virtually increase our RAM by 1GB by adding the below in /etc/rc.local
modprobe zram && \
 echo $((1024*1024*1024)) | tee /sys/block/zram0/disksize && \
 mkswap /dev/zram0 && \
 swapon -p 10 /dev/zram0 && \
 exit 0
and do an immediate activation via
$ sudo modprobe zram && \
 echo $((1024*1024*1024)) | sudo tee /sys/block/zram0/disksize && \
 sudo mkswap /dev/zram0 && \
 sudo swapon -p 10 /dev/zram0
DHCP Configuration
DHCP will be handled by MAAS directly, so we don’t have to handle it. However the way it configures the default settings is pretty brutal, so you might want to tune that a little bit. Below is a /etc/dhcp/dhcpd.conf file that would work and is a little fancier
authoritative;
ddns-update-style none;
log-facility local7;
option subnet-mask 255.255.255.0;
option broadcast-address 192.168.23.255;
option routers 192.168.23.1;
option domain-name-servers 192.168.23.1;
option domain-name “maas”;
default-lease-time 600;
max-lease-time 7200;
subnet 192.168.23.0 netmask 255.255.255.0 {
 range 192.168.23.10 192.168.23.49;
host node00 {
 hardware ethernet B8:AE:ED:7A:B6:92;
 fixed-address 192.168.23.10;
 }
... ...
}
We need also to tell dhcpd to only serve requests on eth1 to prevent flowding our other networks. We do that by editing the INTERFACE option in /etc/default/isc-dhcp-server so it looks like
# On what interfaces should the DHCP server (dhcpd) serve DHCP requests?
# Separate multiple interfaces with spaces, e.g. “eth0 eth1”.
INTERFACES=”eth1"
and finally we restart DHCP with
$ sudo systemctl restart isc-dhcp-server.service
Simple Router Configuration
In our setup, the Raspberry Pi is the point of contention of the network. While MAAS provides DNS and DHCP by default it does not operate as a gateway. Hence our nodes may very well end up blind from the Internet, which we obviously do not want.
So first we activate IP forwarding in sysctl:
sudo touch /etc/sysctl.d/99-maas.conf
echo “net.ipv4.ip_forward=1” | sudo tee /etc/sysctl.d/99-maas.conf
sudo sh -c “echo 1 > /proc/sys/net/ipv4/ip_forward”
Then we need to link our eth0 and eth1 interfaces to allow traffic between them
$ sudo iptables -t nat -A POSTROUTING -o eth0 -j MASQUERADE
$ sudo iptables -A FORWARD -i eth0 -o eth1 -m state — state RELATED,ESTABLISHED -j ACCEPT
$ sudo iptables -A FORWARD -i eth1 -o eth0 -j ACCEPT
OK so now we have traffic passing, which we can test by plugging anything on the LAN interface and trying to ping some internet website.
And we save that in order to make it survive a reboot
sudo sh -c “iptables-save > /etc/iptables.ipv4.nat”
and add this line in /etc/network/interfaces.d/eth1.conf
up iptables-restore < /etc/iptables.ipv4.nat
Configuring MAAS
Pre requisites
$ sudo maas createadmin — username=admin — email=it@madeden.com
Then let’s get access to our API key, and login from the CLI:
$ sudo maas-region apikey — username=admin
Armed with the result of this command, just do:
$ # maas login
$ maas login admin http://localhost/MAAS/api/2.0
Or you can just in one command
$ sudo maas-region apikey — username=admin | \
 maas login admin http://localhost/MAAS/api/2.0 -
Now via the GUI, in the network tab, we rename our fabrics to match LAN, WAN and WLAN.
Then we hit the LAN network, and via the Take Action button, we enable DHCP on it.
The only thing we have to do is to start the nodes once. They will be handled by MAAS directly, and will appear in the GUI after a few minutes.
They will have a random name, and nothing configured.
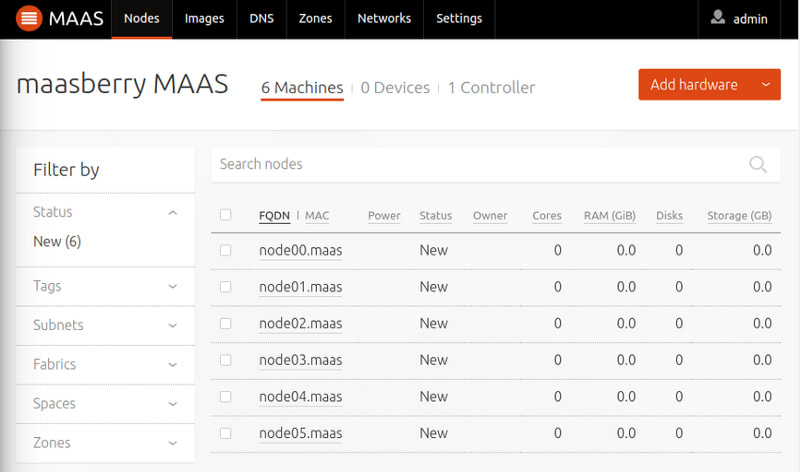
First of all we will rename them. To ease things up, in our experiment, we will use node00 and node01 for the first non GPU nodes, then node02 to 04 being the gpu nodes.
After we name them, we will also
* tag them **cpu-only** for the 2 first management nodes
* tag them **gpu** for the 4 workers.
* Set the power method to **Manual**
We then have something like
Commissioning nodes
This is where the fun begins. We need to “commission nodes”, said otherwise to record information about them (HDD, CPU count…)
There is a bug in MAAS that blocks the deployment of systems. Look at comment #14 and apply it by editing /etc/maas/preseeds/curtin_userdata. In the reboot section to add a delay so it looks like:
power_state:
 mode: reboot
 delay: 30
Then we commission via the Take Action button and selecting Commission, and leave unticked the all 3 other options. Right after that we manually power each of the nodes, and MAAS will do the rest, including power them down at the end of the process. The UI will then look like:
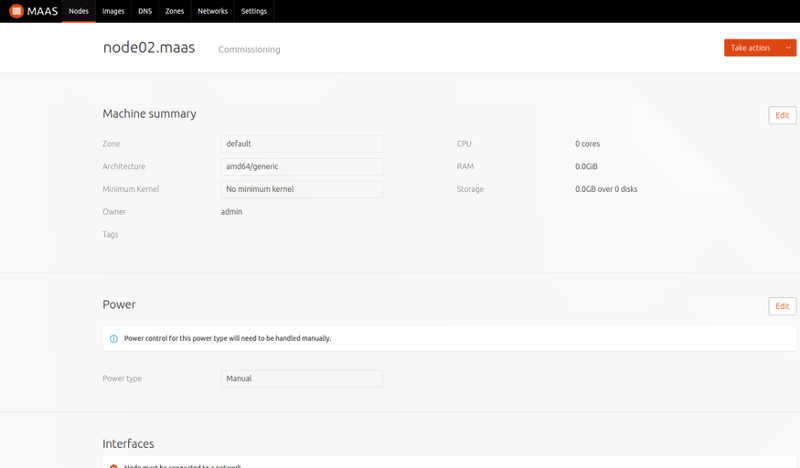
MAAS commissioning nodes

MAAS from New To Commissioned
When commissioning is successful, we see all the values for HDD size, nb cores and memory filled and the node also becomes Ready
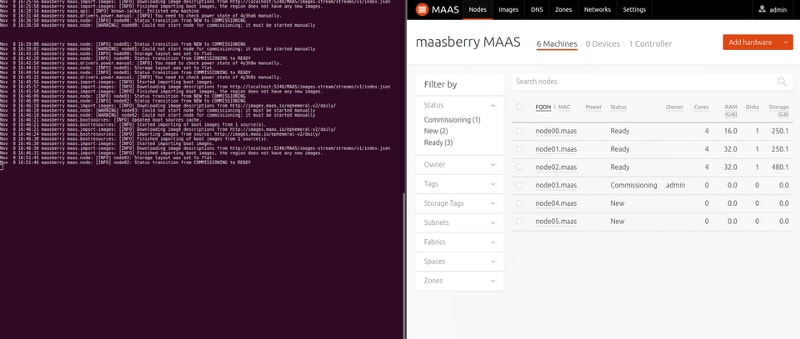
MAAS Logs at commissioning
Deploying with Juju
Bootstrapping the environment
First thing we need to do is connect Juju to MAAS. We create a configuration file for MAAS as provider, maas-juju.yaml, with contents:
maas:
 type: maas
 auth-types: [oauth1]
 endpoint: http:///MAAS
Understand the MAAS_IP address as that from which Juju will interact with MAAS, including the nodes that are deployed. So you can use, in our setup, that of eth1 (192.168.23.1 )
You can find more details on this page
Then we need to tell Juju to use MAAS:
$ juju add-cloud maas maas-juju.yaml
$ juju add-credential maas
Juju needs to bootstrap which brings up a first control node, which will host the Juju Controller, the initial database and various other requirements. This node is the reason we have 2 management nodes. The second one will be our k8s Master.
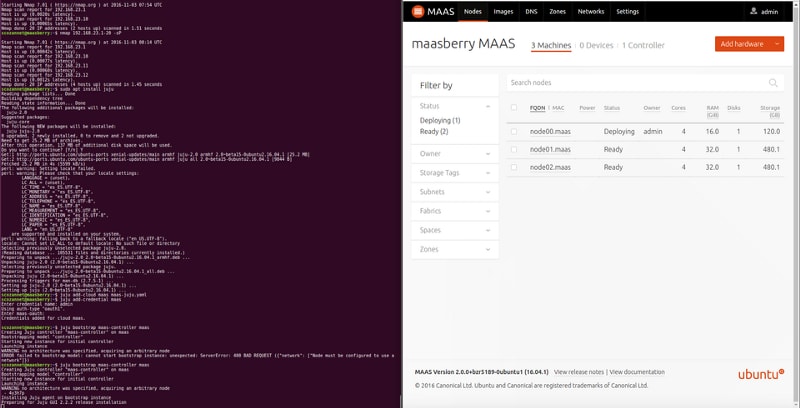
In our setup our nodes have only manual power since WoL was removed from MAAS with v2.0. This means we’ll need to trigger the bootstrap, wait for the node to be allocated, then start it manually.
$ juju bootstrap maas-controller maas
Creating Juju controller “maas-controller” on maas
Bootstrapping model “controller”
Starting new instance for initial controller
Launching instance # This is where we start the node manually
WARNING no architecture was specified, acquiring an arbitrary node
 — 4y3h8w
Installing Juju agent on bootstrap instance
Preparing for Juju GUI 2.2.2 release installation
Waiting for address
Attempting to connect to 192.168.23.2:22
Logging to /var/log/cloud-init-output.log on remote host
Running apt-get update
Running apt-get upgrade
Installing package: curl
Installing package: cpu-checker
Installing package: bridge-utils
Installing package: cloud-utils
Installing package: tmux
Fetching tools: curl -sSfw ‘tools from %{url_effective} downloaded: HTTP %{http_code}; time %{time_total}s; size %{size_download} bytes; speed %{speed_download} bytes/s ‘ — retry 10 -o $bin/tools.tar.gz <[https://streams.canonical.com/juju/tools/agent/2.0-beta15/juju-2.0-beta15-xenial-amd64.tgz]>
Bootstrapping Juju machine agent
Starting Juju machine agent (jujud-machine-0)
Bootstrap agent installed
Bootstrap complete, maas-controller now available.
And the MAAS GUI
Initial bundle deployment
We deploy the bundle file k8s.yaml below:
series: xenial
services:
 “kubernetes-master”:
 charm: “cs:~containers/kubernetes-master-6”
 num_units: 1
 to:
 — “0”
 expose: true
 annotations:
 “gui-x”: “800”
 “gui-y”: “850”
 constraints: tags=cpu-only
 flannel:
 charm: “cs:~containers/flannel-5”
 annotations:
 “gui-x”: “450”
 “gui-y”: “750”
 easyrsa:
 charm: “cs:~containers/easyrsa-3”
 num_units: 1
 to:
 — “0”
 annotations:
 “gui-x”: “450”
 “gui-y”: “550”
 “kubernetes-worker”:
 charm: “cs:~containers/kubernetes-worker-8”
 num_units: 1
 to:
 — “1”
 expose: true
 annotations:
 “gui-x”: “100”
 “gui-y”: “850”
 constraints: tags=gpu
 etcd:
 charm: “cs:~containers/etcd-14”
 num_units: 1
 to:
 — “0”
 annotations:
 “gui-x”: “800”
 “gui-y”: “550”
relations:
 — — “kubernetes-master:kube-api-endpoint”
 — “kubernetes-worker:kube-api-endpoint”
 — — “kubernetes-master:cluster-dns”
 — “kubernetes-worker:kube-dns”
 — — “kubernetes-master:certificates”
 — “easyrsa:client”
 — — “kubernetes-master:etcd”
 — “etcd:db”
 — — “kubernetes-master:sdn-plugin”
 — “flannel:host”
 — — “kubernetes-worker:certificates”
 — “easyrsa:client”
 — — “kubernetes-worker:sdn-plugin”
 — “flannel:host”
 — — “flannel:etcd”
 — “etcd:db”
machines:
 “0”:
 series: xenial
 “1”:
 series: xenial
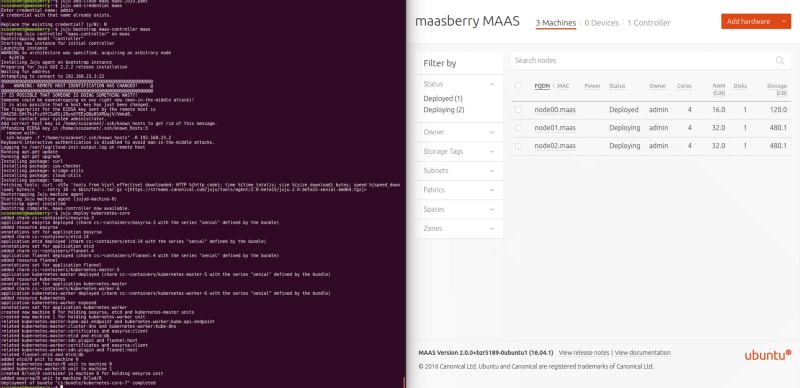
We can see that we have constraints on the nodes to force MAAS to pick up GPU nodes for the workers, and CPU node for the master. We pass the command
$ juju deploy k8s.yamlThat is it. This is the only command we will need to get a functional k8s running!
added charm cs:~containers/easyrsa-3
application easyrsa deployed (charm cs:~containers/easyrsa-3 with the series “xenial” defined by the bundle)
added resource easyrsa
annotations set for application easyrsa
added charm cs:~containers/etcd-14
application etcd deployed (charm cs:~containers/etcd-14 with the series “xenial” defined by the bundle)
annotations set for application etcd
added charm cs:~containers/flannel-5
application flannel deployed (charm cs:~containers/flannel-5 with the series “xenial” defined by the bundle)
added resource flannel
annotations set for application flannel
added charm cs:~containers/kubernetes-master-6
application kubernetes-master deployed (charm cs:~containers/kubernetes-master-6 with the series “xenial” defined by the bundle)
added resource kubernetes
application kubernetes-master exposed
annotations set for application kubernetes-master
added charm cs:~containers/kubernetes-worker-8
application kubernetes-worker deployed (charm cs:~containers/kubernetes-worker-8 with the series “xenial” defined by the bundle)
added resource kubernetes
application kubernetes-worker exposed
annotations set for application kubernetes-worker
created new machine 0 for holding easyrsa, etcd and kubernetes-master units
created new machine 1 for holding kubernetes-worker unit
related kubernetes-master:kube-api-endpoint and kubernetes-worker:kube-api-endpoint
related kubernetes-master:cluster-dns and kubernetes-worker:kube-dns
related kubernetes-master:certificates and easyrsa:client
related kubernetes-master:etcd and etcd:db
related kubernetes-master:sdn-plugin and flannel:host
related kubernetes-worker:certificates and easyrsa:client
related kubernetes-worker:sdn-plugin and flannel:host
related flannel:etcd and etcd:db
added easyrsa/0 unit to machine 0
added etcd/0 unit to machine 0
added kubernetes-master/0 unit to machine 0
added kubernetes-worker/0 unit to machine 1
deployment of bundle “k8s.yaml” completed
Which translates in the GUI as:
$ juju status
MODEL CONTROLLER CLOUD/REGION VERSION
default maas-controller maas 2.0-beta15
APP VERSION STATUS EXPOSED ORIGIN CHARM REV OS
easyrsa 3.0.1 active false jujucharms easyrsa 3 ubuntu
etcd 2.2.5 active false jujucharms etcd 14 ubuntu
flannel 0.6.1 false jujucharms flannel 5 ubuntu
kubernetes-master 1.4.5 active true jujucharms kubernetes-master 6 ubuntu
kubernetes-worker active true jujucharms kubernetes-worker 8 ubuntu
RELATION PROVIDES CONSUMES TYPE
certificates easyrsa kubernetes-master regular
certificates easyrsa kubernetes-worker regular
cluster etcd etcd peer
etcd etcd flannel regular
etcd etcd kubernetes-master regular
sdn-plugin flannel kubernetes-master regular
sdn-plugin flannel kubernetes-worker regular
host kubernetes-master flannel subordinate
kube-dns kubernetes-master kubernetes-worker regular
host kubernetes-worker flannel subordinate
UNIT WORKLOAD AGENT MACHINE PUBLIC-ADDRESS PORTS MESSAGE
easyrsa/0 active idle 0 192.168.23.3 Certificate Authority connected.
etcd/0 active idle 0 192.168.23.3 2379/tcp Healthy with 1 known peers. (leader)
kubernetes-master/0 active idle 0 192.168.23.3 6443/tcp Kubernetes master running.
 flannel/0 active idle 192.168.23.3 Flannel subnet 10.1.57.1/24
kubernetes-worker/0 active idle 1 192.168.23.4 80/tcp,443/tcp Kubernetes worker running.
 flannel/1 active idle 192.168.23.4 Flannel subnet 10.1.67.1/24
kubernetes-worker/1 active executing 2 192.168.23.5 (install) Container runtime available.
kubernetes-worker/2 unknown allocating 3 192.168.23.7 Waiting for agent initialization to finish
kubernetes-worker/3 unknown allocating 4 192.168.23.6 Waiting for agent initialization to finish
MACHINE STATE DNS INS-ID SERIES AZ
0 started 192.168.23.3 4y3h8x xenial default
1 started 192.168.23.4 4y3h8y xenial default
2 started 192.168.23.5 4y3ha3 xenial default
3 pending 192.168.23.7 4y3ha6 xenial default
4 pending 192.168.23.6 4y3ha4 xenial default
or

$ juju status
MODEL CONTROLLER CLOUD/REGION VERSION
default maas-controller maas 2.0-beta15
APP VERSION STATUS EXPOSED ORIGIN CHARM REV OS
cuda false local cuda 0 ubuntu
easyrsa 3.0.1 active false jujucharms easyrsa 3 ubuntu
etcd 2.2.5 active false jujucharms etcd 14 ubuntu
flannel 0.6.1 false jujucharms flannel 5 ubuntu
kubernetes-master 1.4.5 active true jujucharms kubernetes-master 6 ubuntu
kubernetes-worker 1.4.5 active true jujucharms kubernetes-worker 8 ubuntu
RELATION PROVIDES CONSUMES TYPE
certificates easyrsa kubernetes-master regular
certificates easyrsa kubernetes-worker regular
cluster etcd etcd peer
etcd etcd flannel regular
etcd etcd kubernetes-master regular
sdn-plugin flannel kubernetes-master regular
sdn-plugin flannel kubernetes-worker regular
host kubernetes-master flannel subordinate
kube-dns kubernetes-master kubernetes-worker regular
host kubernetes-worker flannel subordinate
UNIT WORKLOAD AGENT MACHINE PUBLIC-ADDRESS PORTS MESSAGE
easyrsa/0 active idle 0 192.168.23.3 Certificate Authority connected.
etcd/0 active idle 0 192.168.23.3 2379/tcp Healthy with 1 known peers. (leader)
kubernetes-master/0 active idle 0 192.168.23.3 6443/tcp Kubernetes master running.
 flannel/0 active idle 192.168.23.3 Flannel subnet 10.1.57.1/24
kubernetes-worker/0 active idle 1 192.168.23.4 80/tcp,443/tcp Kubernetes worker running.
 flannel/1 active idle 192.168.23.4 Flannel subnet 10.1.67.1/24
kubernetes-worker/1 active idle 2 192.168.23.5 80/tcp,443/tcp Kubernetes worker running.
 flannel/2 active idle 192.168.23.5 Flannel subnet 10.1.100.1/24
kubernetes-worker/2 active idle 3 192.168.23.7 80/tcp,443/tcp Kubernetes worker running.
 flannel/3 active idle 192.168.23.7 Flannel subnet 10.1.14.1/24
kubernetes-worker/3 active idle 4 192.168.23.6 80/tcp,443/tcp Kubernetes worker running.
 flannel/4 active idle 192.168.23.6 Flannel subnet 10.1.83.1/24
MACHINE STATE DNS INS-ID SERIES AZ
0 started 192.168.23.3 4y3h8x xenial default
1 started 192.168.23.4 4y3h8y xenial default
2 started 192.168.23.5 4y3ha3 xenial default
3 started 192.168.23.7 4y3ha6 xenial default
4 started 192.168.23.6 4y3ha4 xenial default
We now need kubectl to query the cluster. We need to relate to this k8s issue and the method for Hypriot OS
$ curl -s https://packages.cloud.google.com/apt/doc/apt-key.gpg | apt-key add -
$ cat < /etc/apt/sources.list.d/kubernetes.list
deb http://apt.kubernetes.io/ kubernetes-xenial main
EOF
$ apt-get update
$ apt-get install -y kubectl
$ kubectl get nodes — show-labels
NAME STATUS AGE LABELS
node02 Ready 1h beta.kubernetes.io/arch=amd64,beta.kubernetes.io/os=linux,kubernetes.io/hostname=node02
node03 Ready 1h beta.kubernetes.io/arch=amd64,beta.kubernetes.io/os=linux,kubernetes.io/hostname=node03
node04 Ready 57m beta.kubernetes.io/arch=amd64,beta.kubernetes.io/os=linux,kubernetes.io/hostname=node04
node05 Ready 58m beta.kubernetes.io/arch=amd64,beta.kubernetes.io/os=linux,kubernetes.io/hostname=node05
Adding CUDA
CUDA does not have an official charm yet, so I wrote a hacky bash script to make it work, which you can find on GitHub
To build the charm you’ll want a x86 computer rather than the Rpi. You will need juju, charm and charm-tools installed there, then run
$ export JUJU_REPOSITORY=${HOME}/charms
$ export LAYER_PATH=${JUJU_REPOSITORY}/layers
$ export INTERFACE_PATH=${JUJU_REPOSITORY}/interfaces
$ cd ${LAYER_PATH}
$ git clone https://github.com/SaMnCo/layer-nvidia-cuda cuda
$ cd juju-layer-cuda
$ charm build
Which will create a new folder called builds in JUJU_REPOSITORY, and another called cuda in there. Just scp that to the Raspberry Pi in a charms subfolder of your home.
$ scp ${JUJU_REPOSITORY}/builds/cuda ${USER}@raspberrypi:/home/${USER}/charms/cuda
$ git clone https://github.com/SaMnCo/layer-nvidia-cuda cuda
$ cd juju-layer-cuda
$ charm build
To deploy the charm we just created,
$ juju deploy — series xenial $HOME/charms/cuda
$ juju add-relation cuda kubernetes-worker
This will take some time (CUDA downloads gigabytes of code and binaries…), but ultimately we get to
$ juju status
MODEL CONTROLLER CLOUD/REGION VERSION
default maas-controller maas 2.0-beta15
APP VERSION STATUS EXPOSED ORIGIN CHARM REV OS
cuda false local cuda 0 ubuntu
easyrsa 3.0.1 active false jujucharms easyrsa 3 ubuntu
etcd 2.2.5 active false jujucharms etcd 14 ubuntu
flannel 0.6.1 false jujucharms flannel 5 ubuntu
kubernetes-master 1.4.5 active true jujucharms kubernetes-master 6 ubuntu
kubernetes-worker 1.4.5 active true jujucharms kubernetes-worker 8 ubuntu
RELATION PROVIDES CONSUMES TYPE
juju-info cuda kubernetes-worker regular
certificates easyrsa kubernetes-master regular
certificates easyrsa kubernetes-worker regular
cluster etcd etcd peer
etcd etcd flannel regular
etcd etcd kubernetes-master regular
sdn-plugin flannel kubernetes-master regular
sdn-plugin flannel kubernetes-worker regular
host kubernetes-master flannel subordinate
kube-dns kubernetes-master kubernetes-worker regular
juju-info kubernetes-worker cuda subordinate
host kubernetes-worker flannel subordinate
UNIT WORKLOAD AGENT MACHINE PUBLIC-ADDRESS PORTS MESSAGE
easyrsa/0 active idle 0 192.168.23.3 Certificate Authority connected.
etcd/0 active idle 0 192.168.23.3 2379/tcp Healthy with 1 known peers. (leader)
kubernetes-master/0 active idle 0 192.168.23.3 6443/tcp Kubernetes master running.
 flannel/0 active idle 192.168.23.3 Flannel subnet 10.1.57.1/24
kubernetes-worker/0 active idle 1 192.168.23.4 80/tcp,443/tcp Kubernetes worker running.
 cuda/2 active idle 192.168.23.4 CUDA installed and available
 flannel/1 active idle 192.168.23.4 Flannel subnet 10.1.67.1/24
kubernetes-worker/1 active idle 2 192.168.23.5 80/tcp,443/tcp Kubernetes worker running.
 cuda/0 active idle 192.168.23.5 CUDA installed and available
 flannel/2 active idle 192.168.23.5 Flannel subnet 10.1.100.1/24
kubernetes-worker/2 active idle 3 192.168.23.7 80/tcp,443/tcp Kubernetes worker running.
 cuda/3 active idle 192.168.23.7 CUDA installed and available
 flannel/3 active idle 192.168.23.7 Flannel subnet 10.1.14.1/24
kubernetes-worker/3 active idle 4 192.168.23.6 80/tcp,443/tcp Kubernetes worker running.
 cuda/1 active idle 192.168.23.6 CUDA installed and available
 flannel/4 active idle 192.168.23.6 Flannel subnet 10.1.83.1/24
MACHINE STATE DNS INS-ID SERIES AZ
0 started 192.168.23.3 4y3h8x xenial default
1 started 192.168.23.4 4y3h8y xenial default
2 started 192.168.23.5 4y3ha3 xenial default
3 started 192.168.23.7 4y3ha6 xenial default
4 started 192.168.23.6 4y3ha4 xenial default
Pretty awesome, we now have CUDERNETES!
We can individually connect on every GPU node and run
$ sudo nvidia-smi
Wed Nov 9 06:06:44 2016
+ — — — — — — — — — — — — — — — — — — — — — — — — — — — — — — — — — — — — — — -+
| NVIDIA-SMI 367.57 Driver Version: 367.57 |
| — — — — — — — — — — — — — — — -+ — — — — — — — — — — — + — — — — — — — — — — — +
| GPU Name Persistence-M| Bus-Id Disp.A | Volatile Uncorr. ECC |
| Fan Temp Perf Pwr:Usage/Cap| Memory-Usage | GPU-Util Compute M. |
|===============================+======================+======================|
| 0 GeForce GTX 106… Off | 0000:02:00.0 Off | N/A |
| 28% 31C P0 27W / 120W | 0MiB / 6072MiB | 0% Default |
+ — — — — — — — — — — — — — — — -+ — — — — — — — — — — — + — — — — — — — — — — — +

+ — — — — — — — — — — — — — — — — — — — — — — — — — — — — — — — — — — — — — — -+
| Processes: GPU Memory |
| GPU PID Type Process name Usage |
|=============================================================================|
| No running processes found |
+ — — — — — — — — — — — — — — — — — — — — — — — — — — — — — — — — — — — — — — -+
Good job!!
Enabling CUDA in Kubernetes
By default, CDK will not activate GPUs when starting the API server and the Kubelet on workers. We need to do that manually (though this is on the roadmap)
Master Update
On the master node, update /etc/default/kube-apiserver to add:
# Security Context
KUBE_ALLOW_PRIV=” — allow-privileged=true”
Then restart the API service via
$ sudo systemctl restart kube-apiserver
So now the Kube API will accept requests to run privileged containers, which are required for GPU workloads.
Worker nodes
On every worker, /etc/default/kubelet to to add the GPU tag, so it looks like:
# Security Context
KUBE_ALLOW_PRIV=” — allow-privileged=true”
# Add your own!
KUBELET_ARGS=” — experimental-nvidia-gpus=1 — require-kubeconfig — kubeconfig=/srv/kubernetes/config — cluster-dns=10.1.0.10 — cluster-domain=cluster.local”
Then restart the service via
$ sudo systemctl restart kubeletTesting the setup
Now that we have CUDA GPUs enabled in k8s, let us test that everything works. We take a very simple job that will just run nvidia-smi from a pod and exit on success.
The job definition is
apiVersion: batch/v1
kind: Job
metadata:
 name: nvidia-smi
 labels:
 name: nvidia-smi
spec:
 template:
 metadata:
 labels:
 name: nvidia-smi
 spec:
 containers:
 — name: nvidia-smi
 image: nvidia/cuda
 command: [ “nvidia-smi” ]
 imagePullPolicy: IfNotPresent
 securityContext:
 privileged: true
 resources:
 requests:
 alpha.kubernetes.io/nvidia-gpu: 1
 limits:
 alpha.kubernetes.io/nvidia-gpu: 1
 volumeMounts:
 — mountPath: /dev/nvidia0
 name: nvidia0
 — mountPath: /dev/nvidiactl
 name: nvidiactl
 — mountPath: /dev/nvidia-uvm
 name: nvidia-uvm
 — mountPath: /usr/local/nvidia/bin
 name: bin
 — mountPath: /usr/lib/nvidia
 name: lib
 volumes:
 — name: nvidia0
 hostPath:
 path: /dev/nvidia0
 — name: nvidiactl
 hostPath:
 path: /dev/nvidiactl
 — name: nvidia-uvm
 hostPath:
 path: /dev/nvidia-uvm
 — name: bin
 hostPath:
 path: /usr/lib/nvidia-367/bin
 — name: lib
 hostPath:
 path: /usr/lib/nvidia-367
 restartPolicy: Never
What is interesting here is
- We do not have the abstraction provided by nvidia-docker, so we have to specify manually the mount points for the char devices
- We also need to share the drivers and libs folders
In the resources, we have to both request and limit the resources with 1 GPU - The container has to run privileged
Now if we run this:
$ kubectl create -f nvidia-smi-job.yaml
$ # Wait for a few seconds so the cluster can download and run the container
$ kubectl get pods -a -o wide
NAME READY STATUS RESTARTS AGE IP NODE
default-http-backend-8lyre 1/1 Running 0 11h 10.1.67.2 node02
nginx-ingress-controller-bjplg 1/1 Running 1 10h 10.1.83.2 node04
nginx-ingress-controller-etalt 0/1 Pending 0 6m
nginx-ingress-controller-q2eiz 1/1 Running 0 10h 10.1.14.2 node05
nginx-ingress-controller-ulsbp 1/1 Running 0 11h 10.1.67.3 node02
nvidia-smi-xjl6y 0/1 Completed 0 5m 10.1.14.3 node05
We see the last container has run and completed. Let us see the output of the run
$ kubectl logs nvidia-smi-xjl6y
Wed Nov 9 07:52:42 2016
+ — — — — — — — — — — — — — — — — — — — — — — — — — — — — — — — — — — — — — — -+
| NVIDIA-SMI 367.57 Driver Version: 367.57 |
| — — — — — — — — — — — — — — — -+ — — — — — — — — — — — + — — — — — — — — — — — +
| GPU Name Persistence-M| Bus-Id Disp.A | Volatile Uncorr. ECC |
| Fan Temp Perf Pwr:Usage/Cap| Memory-Usage | GPU-Util Compute M. |
|===============================+======================+======================|
| 0 GeForce GTX 106… Off | 0000:02:00.0 Off | N/A |
| 28% 33C P0 29W / 120W | 0MiB / 6072MiB | 0% Default |
+ — — — — — — — — — — — — — — — -+ — — — — — — — — — — — + — — — — — — — — — — — +

+ — — — — — — — — — — — — — — — — — — — — — — — — — — — — — — — — — — — — — — -+
| Processes: GPU Memory |
| GPU PID Type Process name Usage |
|=============================================================================|
| No running processes found |
+ — — — — — — — — — — — — — — — — — — — — — — — — — — — — — — — — — — — — — — -+
Perfect, we have the same result as if we had run nvidia-smi from the host, which means we are all good to operate GPUs!
Conclusion
So what did we achieve here? Kubernetes is the most versatile container management system around. It also shares some genes with Tensorflow, which itself got often demoed as containers, in a scale out fashion.
It is only natural to fasten Deep Learning workload by adding GPUs at scale. This poor man GPU cluster is an example of what can be done for a small R&D team if they wanted to experiment with multi node scalability.
We have a secondary benefit. You noticed that the deployment of k8s is completely automated here (beside the GPU inclusion), thanks to Juju and the team behind CDK. Well, the community behind Juju creates many charms, and there is a large collection of scale out applications that can be deployed at scale, like Hadoop, Kafka, Spark, Elasticsearch (…).
In the end, the investment is only MAAS and a few commands. Juju’s ROI in R&D is a matter of days.
Thanks
Huge thanks to Marco Ceppi, Chuck Butler and Matt Bruzek at Canonical for the fantastic work on CDK, and responsiveness to my (numerous) questions.

What’s the risk of unsolved vulnerabilities in Docker images?
Having a trusted source for your dependencies is critical for a secure software supply chain. How confident are you in your container security? See how Ubuntu and Canonical can help.
Newsletter signup
Related posts
A better way to provision NVIDIA BlueField DPUs at scale with MAAS
The recent release of MAAS 3.7 introduces a significant new capability: the ability to provision NVIDIA BlueField Data Processing Units (DPUs) directly...
Deploy your Spring Boot application to production
In this article we walk through the steps required to deploy a Spring Boot application to production using Juju and Kubernetes. The goal is to showcase the...
Harnessing the potential of 5G with Kubernetes: a cloud-native telco transformation perspective
Telecommunications networks are undergoing a cloud-native revolution. 5G promises ultra-fast connectivity and real-time services, but achieving those benefits...

